Tuesday, 31 July 2012

The Scarlet Phantom

The Phantoms

The Scarlet Phantom (a.k.a. Red Phantom) was one of the more elusive MHs in the Five Star Stories Series. The phantoms are a breed of MHs of mysterious origin known to first appear during the Great War of Magi in the FFS manga series. There are a total of three phantom models which are differentiated mainly by their colouration of red, white and black. As such, they were appropriately (or rather uncreatively) named as the Scarlet/Red phantom, White Phantom and Black Phantom respectively.


The Phantoms from the FSS series
Source: http://www.gearsonline.net
The phantoms all share identical physical characteristics with each other with only minor variations (as far as the GK figures are concerned) in the design of the shields they carry, their horns, their stabilisers (the tendrils sticking out of the back of their heads), their weapons and obviously their colour.


Hence, in order to fuel my addiction for the robots from the Five Star Stories series, I had to get myself one of those phantoms! Not just because they're mysterious and look extremely awesome, but also because I have a strange and dark affinity to skulls and all things bony... d(>_<)b


This time I decided to go for a 1/100 scale model instead in hopes that I would have to deal with fewer super small & fragile parts (lesson learnt from my 1/144 scale Yen Xing). The kit took just under 2 weeks to arrive from Hong Kong and cost me a heavier price tag of $75 plus delivery. The kit was manufactured by G.K. Factory in Hong Kong and I highly recommend their mecha kits as they have rather excellent casting quality.


Scarlet Phantom 1/100 Scale Resin Model Kit


I have long adopted he habit of always checking the parts list whenever I fix anything. Providentially, the habit paid of today as I discovered that a rather important piece was omitted in the kit. It was just a minor inconvenience as I contacted the seller and he delivered the missing part to me via post at no extra cost 2 weeks later.


The missing chest piece that arrived 2 weeks later
The individual parts of the kit packed according to their respective sizes


The Parts...

The parts list. The circled piece was initially missing.
The stabilisers were the most fragile parts of the kit
The body and lower leg armour
The shoulder & forearm armour and the feet
The skirt armour and the horns
The arms, heels, hind leg and shoulder parts
Other smaller miscellaneous parts
The head upclose

Overall, I'll have to say that I'm very pleased with the casting quality of this kit. It had minimal clean up (for a mecha kit at least), only a few pin holes & voids to fill and all parts fit rather perfectly. Pinning, however, was still a pain as the kit contains a total of ~90+ parts and I still use a manual pin vice for drilling the holes as it provides better control.


(-_-)...zzZ

Sunday, 15 July 2012

Machine Messiah Yen Xing


My first resin kit finally arrived! Woohoo! :D
Delivery itself cost $10 and the package arrived in ~10 days

This is a 1/144 scale model of the Machine Messiah Yen Xing from the Five Star Stories (FSS). It is a resin garage kit reproduction by Super G. It cost me $55 USD plus shipping directly to my doorstep from Hong Kong.
Machine Messiah Yen Xing from the FFS manga by Mamoru Nagano
The box of the resin kit


The parts of the kit were packed in separate compartments according to their respective sizes. I have to say that the parts were smaller than expected and were rather hard to handle. I would most likely stick to 1/100 scale FSS kits in the future.
The resin parts. Highly intricate and fragile...


The kit did come with a surprising number of pieces. Some of which were extremely small and fragile. Clearing off all the gates and flesh will require substantial work and caution in future.
Some of the parts were really tiny and super sharp!


I'd have to say that I was rather pleased with the quality of the casting for this kit. Despite their small size, the resin parts retained most of the crisp detail from the mould and also appear to fit rather well together.


In addition, the kit also came with several aluminium cast parts (for the 2 heels and the sword blade). However, I'm not too sure I'll be using any of them as the resin parts will be easier to work with and painting them a metallic silver wouldn't be all that difficult.


I'll be cleaning the parts, removing the gates and flesh and test fitting the resin parts next...


(-_-)...zzZ

Thursday, 5 July 2012

Happy Birthday To Me! :D

Yeah, it's my birthday this month and I just received my birthday present(s) from my beloved fiancé! Woohooo! :D For those who do not know it yet, I am currently engaged to my one and only sweetheart (BJ: yes, you know this post is dedicated to you ;D). She got me exactly what I needed this year; well, I did drop a few "hints" here and there but nevertheless, she's so understanding! :D Thank you so much for always being there whenever I needed you and for all your patience with me whenever I'm working (yes, she accompanied me throughout while I was at work for 20 straight hours once) and for your company whenever I was fixing my models too! I love you to bits!!! <3 (*_*) <3

So... Here is what I got from my dearly beloved:


Fine saw blades: For removing large gates on resin model parts
Edge cutters: For removing flash or nubs
Fine edged file: Obviously for filing and smoothing

Artist acrylic paints: I have yet to experiment with them on my models but I read that they can be pretty good...
Brushes: For painting... Still considering if I need better detailing brushes...
Wire brushes: For cleaning up my files

White primer: Required for priming resin parts prior to painting with acrylics
Vaseline: Used as a release agent when puttying
Pledge floor wax: I read that it is a good alternative to gloss top-coating though I have not tried it yet...

Aluminium wire: I chose this as an alternative to galvanised steel as they are easier to bend and cut 

Mr. Mark softer: Used to soften water transfer decals and allows better adhesion to complex or contoured surfaces

They are mainly all essential supplies that I need to start working on my resin garage kits :3


(-_-)...zzZ

L.E.D. Mirage: The Final Assembly

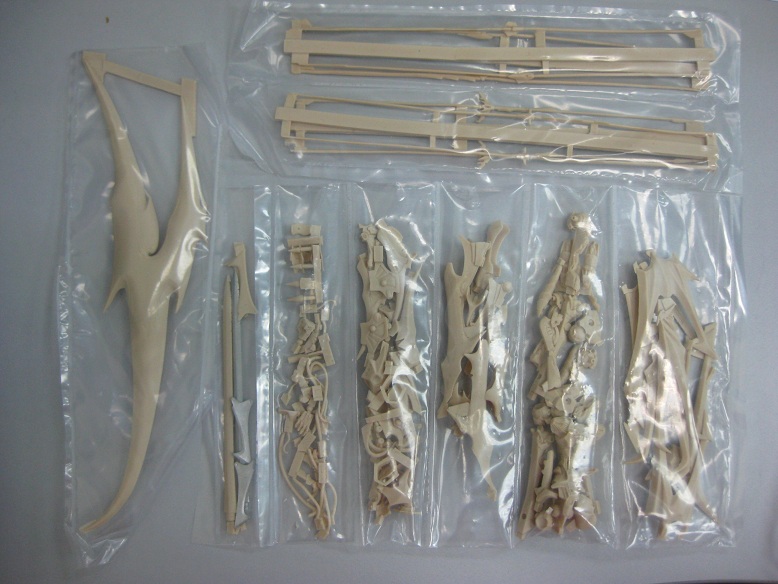
The assembly of the LED Mirage has been finally completed. Fortunately, the parts of the styrene kit still fit rather perfectly with each other despite the old age of the kit. The instructions were rather straight forward and the assembly process was completed in under 2 hours. The parts of the kit were glued together using regular cyanoacrylate (CA) glue or more commonly known as "super glue".


Fortunately, the manual was still completely intact...

The arms had to be assembled following a specific order as certain parts had to be glued and assembled prior to the final assembly of the shoulder armour.

The large surface area of the feet together with the hind stabilisers provided superb stability to the completed model.

The chest assembly was rather complicated as there were a number of accessory parts that had to be glued onto specific areas that were hard to access.

The completed top portion of the figure was my favourite part as it looked really good on its own.

Arranging and fixing all the armour plates on the lower hip section was rather difficult as the parts had to be attached into micrometer accurate grooves and slots. Some of the paint had to be scraped off in order to allow the parts to fit properly.

All parts of the LED Mirage have been assembled and the only thing left is to put it all together! :)

And finally... The completed L.E.D. Mirage!


Closing...

My goal or reviving my old LED Mirage has been achieved. Overall, it was rather fun to dig up an old kit and rebuild it from scratch. However, I get the feeling that this would probably be the last time I would work on a commercial styrene kit. As fun as commercial kits go, they still lack an element of novelty. Hence, I have decided to start working on resin garage kits [GK] in the future. I have recently purchased 2 new resin garage kits, both from the Five Star Stories series and will start working on them soon!


(-_-)...zzZ